Photoshop® for beginners.
Adobe® Photoshop® software is great for photo editing and is used as an industry standard tool in the printing and media industry. With such a good reputation it is also bought for personal use. But for people who don’t know their way around Photoshop®, it can be quite daunting.
This first beginners tutorial will help you get to grips with the basics. It will show you how to do the simple things that most people want to do with a digital photo or scanned image. I am using Adobe® Photoshop® CS4 and the screen shots will come from this version. But you will find that most versions will have similar menus and you will be able to find the options in the instructions below once you know what you are looking for, even if they are not in the same place.
So let’s begin.
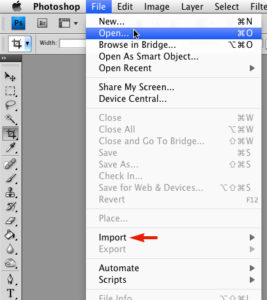
Open your image in Photoshop® either by going to FILE -> OPEN and opening the saved file from your computer, or if you are scanning an image go to FILE -> IMPORT and choose your scanner from the list. (See fig. 1., click on the images to see larger versions.) You will then need to follow the instructions in your scanning software to scan the image and it will open in Photoshop®. (See our article on the best scanning settings for information on scanning.)
Showing the Rulers
Once you have an image open in Photoshop®, the first thing I like to be able to see are the image rulers that appear at the top and left of the image window.
- to show the rulers at the side and top of the picture window go to VIEW –> RULERS. (Fig. 2a.)
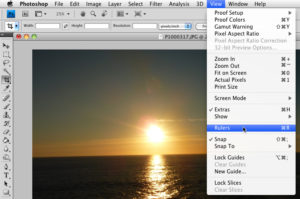
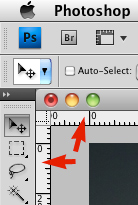
This allows me to see at a glance the size of the image, and if I want to measure or add guides to the image I can drag them on to the picture window from the rulers.
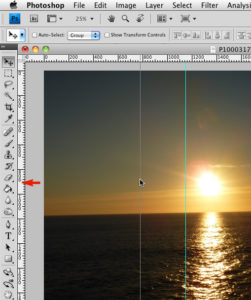
- to add a vertical guide to the image window click and hold the mouse pointer in the ruler on the left side and then drag the guide into the image window and place it where you want it. (See fig. 3.)
Rotating Images
One of the most common things you will want to do with an image is rotate it. Perhaps the image was scanned and wasn’t completely straight on the scanner bed, or maybe that digital photograph of the sea view has a wonky horizon. You may need to rotate a portrait image by ninety degrees if you turned your camera round when you took the photo. Photoshop® easily allows you to do all these tasks, whether you need to rotate an image only slightly, or a hundred and eighty degrees.
To rotate a picture
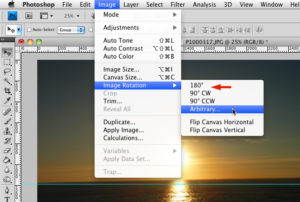
- For minor or slight adjustments go to IMAGE -> ROTATE CANVAS -> ARBITRARY (Photoshop® version 7) or IMAGE -> IMAGE ROTATION -> ARBITRARY (Photoshop® CS4) for minor adjustments. A dialogue box will open. (Whichever version of Photoshop® you are using you need to find the ROTATE->ARBITRARY option under the IMAGE menu.)
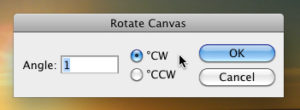
- Choose Clockwise or Counter Clockwise and an amount, 1 or 2 degrees is a good starting place. Click OK and look at the results to see if it’s correct. Use the undo button (EDIT -> UNDO) if you are not happy with the result, or repeat as necessary if it wasn’t rotated quite enough.
- Under the same menu option in instruction 1. above (fig. 4a.) there are also options to rotate the image by 90 or 180 degrees. Choose one of these options to rotate the image once in that direction.
Cropping Images
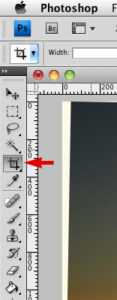
Another task you will more than likely want to perform is cropping and image. Cropping an image allows you to remove unwanted areas in your photo, or to frame the image differently so that another part of the image becomes the focus. For whatever reason you want to crop your image, here’s how to do it in Photoshop®.
- In the left toolbar (the pallet that appears down the left side), choose the Crop tool (see fig. 5a.).
- In the image window, click the mouse, hold the button down and drag to draw a marquee around the area you want to crop.
- If the crop area isn’t quite right, adjust the edges of the marquee by clicking and dragging the square blocks on the marquee edges.
- When you are happy with the image crop, double click inside the crop area with the mouse, or click the tick in the toolbar that goes across the top of the image window. (To cancel the crop click the no-entry/delete symbol next to the tick, see fig. 0.).
- Again if you are not happy with how the crop looks you can Undo it.
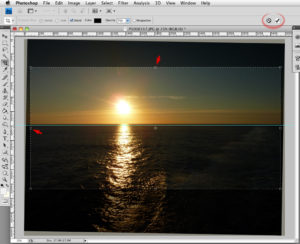
Fig. 5b. The marquee shows the area to crop with the cropped parts darkened.
Resizing Images
You may need to resize your image, for example if you want to send it by email and it is too large you can make the file size smaller by resizing the image. Most digital cameras have a good quality setting which allows you take photos at a quality good enough for printing, but if you want to email the same photo to a friend it is best to resize it so that it is smaller first. If you have scanned an image at 300dpi for printing, it would also be advisable to resize the image if you want to email it.
To resize an image in Photoshop®:
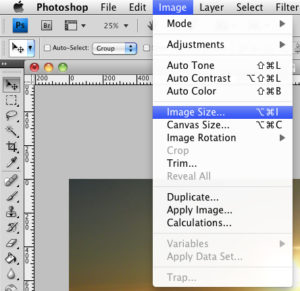
- Go to IMAGE –> IMAGE SIZE. A new dialogue box will open.
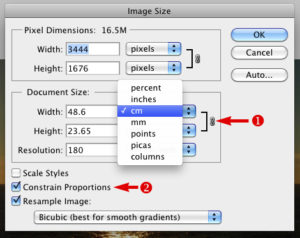
- In the new window, you have the option to work in pixels at the top, or in Inches, Centimetres or Percentage under document size below that. It depends on what you are resizing the image for as to which set of dimensions you would prefer to use. To resize the image for email it is good to work in pixels, and setting the width to 640 pixels will create an image that is a good size to email. In whichever set of dimensions you prefer to use, set the new size you want the image to be. You can change to inches, cms or percent using the drop down menu to the right side of the dimensions.
- If you see the links and a padlock joining the two dimensions (fig. 6b. number 1) then you will only need to put a new value in one dimension and the image will be resized proportionately. To change the image size un-proportionately, uncheck the Constrain Properties check box and the width and height can then be changed individually. (Fig. 6b. number 2.)
- Click OK when you are happy with the dimensions, and your image will be resized. (Remember the Undo button if you are not happy with changes.)
Saving the image
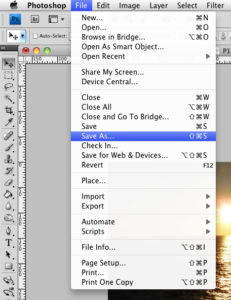
Don’t forget to save the image once you have made all your changes. Go to FILE -> SAVE AS to save a new version of the image without overwriting the original image.
You will need to choose a file format for saving your image. Photoshop® has it’s own native image file format known as a .psd or Photoshop® document, this file format is for more advanced users wanting to maintain layers and other special effects applied in Photoshop®. For most uses the usual format to save a photo is a .jpg or .jpeg. This file format is suitable for emailing, use online, and if it is saved with high quality compression settings it can be used for printing. If you want a superior quality image file for commercial printing however, it is better to save the image as a .tiff file as this file format has no compression applied to it and maintains its quality. (A future article on Enlightenment will explain image types further, look out for that for more information.)
To save a .jpg file:
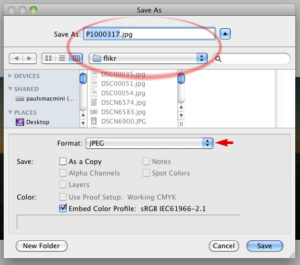
- Got to FILE -> SAVE AS (Fig. 7a.) and a new dialogue box will open.
- Choose jpeg from the Format drop down menu. (Fig. 7b.)
- Choose a name and a location on your computer for your new image at the top of the dialogue box.
- Click SAVE at the bottom right of the window and another dialogue box will open with the compression settings to apply to the image.
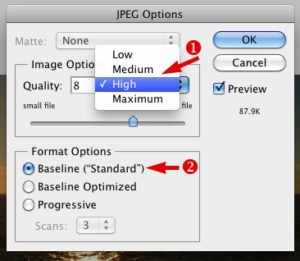
- Choose Medium or High from the Quality drop down box for images you are going to email or use online. Choose Maximum and slide the sliderunderneath all the way to the right side to save a good quality image for commercial printing. (Fig. 7c. number 1.)
- Make sure the Format Options are set to Baseline (Standard) this is another advanced feature of Photoshop®, the other formats are used for creating special kinds of jpegs for use on websites. Saving in standard format will always produced a useable file. (Fig. 7c. number 2.)
- Click OK at the top right of the dialogue box and the new image will be saved to your computer.
Well, that’s all for this tutorial I hope this has helped you with the basic tasks in Photoshop®. Leave a comment to let me know how you are doing and if there’s anything else you’d like to know.


